


Previously in this blog series, we covered the reasons why you want to be found online and the importance of online branding for insurance agents. Then, we explained how to perform keyword research to isolate the search terms your prospective insurance customers are typing to find the solutions you sell. Now, in this post, we’ll go over everything you need to know to create your own insurance website, so you can position yourself for maximum online exposure.
In this article, we’ll cover:
- Domain and hosting options
- Which content management system (CMS) you should use
- What pages you need on your website
- The difference between pages and posts
- The elements of an effective landing page
- The importance of going mobile
Whether you create your own insurance website or hire a web design agency to do it for you, you need to read this first, so you know the essential elements of a successful website that builds trust, boosts referrals, and brings in a steady flow of internet insurance leads.
Master of Your Own Domain

Before building your website, you first need your own domain and hosting providers.
A domain is the actual web address of the website, commonly known as the “URL,” like www.leadheroes.com. The domain has three main parts: the prefix, the site name, and the top-level domain. The prefix is usually shown as “www.”, “http://www.”, or “https://www.” but sometimes there might not be a prefix at all. The site name can be anything that’s not already taken, except the name of any known brand, which could be considered copyright infringement. Finally, the top-level domain, or TLD, usually takes the form of “.com,” but you can also choose “.org”, “info”, or “.biz” or countless others.

Some places to find affordable domains are 1and1.com, Namecheap, and GoDaddy. Prices will range from $1-$100 a year for a domain, but if you want to know a secret, many hosting companies will give you a domain for free if you buy a hosting package from them!
Choosing a Good Web Host
Hosting is what allows a website to connect to the world wide web or internet. Basically, hosting is where you store your website and its content. Popular and affordable hosts include Bluehost, HostGator, and WP Engine, each with several hosting options to choose from. Usually you will find these three options:
- Shared hosting: The cheapest option, but because you’re sharing the hosting server with other websites, speed and availability can be spotty.
- Virtual Private Server: This option, which is similar to owning a laptop in the ‘cloud,’ offers more space and speed, but you have to pay more for it.
- Dedicated Server: This gives you the most amount of space and speed because you have complete control over your own server, but be prepared to spend hundreds per month for this option.
When you’re starting out, a shared hosting option should suffice. Then, when your internet traffic has grown to around 10,000 visitors a month, you’ll want to consider switching to a dedicated server. You can go with a VPS if you want, but I find that option #3 is the better value.
WordPress, Joomla!, or Drupal?

Once you’ve picked out a domain and a hosting provider, the next decision is what content management system (CMS) you want to use. A CMS is a way of designing your website. The three most common CMS platforms to use are:
- WordPress.com (not to be confused with WordPress.org)
- Joomla!
- Drupal
Rather than spend the next few pages of this article debating the differences, pros, and cons of these open-source CMS platforms, please peruse these in-depth articles that do the heavy lifting for us:
- http://www.wpbeginner.com/opinion/wordpress-vs-joomla-vs-drupal-which-one-is-better/
- https://websitesetup.org/cms-comparison-wordpress-vs-joomla-drupal/
- https://www.webhostingsecretrevealed.net/blog/web-tools/compare-top-3-cms-2017-wordpress-vs-joomla-vs-drupal/
- https://business.tutsplus.com/articles/wordpress-vs-joomla-vs-drupal-cms-comparison-guide–cms-26581
- https://makeawebsitehub.com/content-management-system-cms-comparison/
For the rest of this article, we will make the assumption that you read these articles, took notes, and decided that WordPress was the best CMS for your insurance website. The only thing you need to do before you can start actually editing and creating your website is to install your CMS of choice. Most platforms have one-click installs that simplify setting up a website. After you install your CMS, you can decide your URL prefix, and set your login username and password to allow you access to the back-office where you can design how your site will function and look.
What About WYSIWYG Options?

WYSIWYG stands for What-You-See-Is-What-You-Get, which is a phrase used to describe easy-to-design (and sometimes free) website builders that let you use a “drag-and-drop” editor to create a site. Usually they have tons of customizable design options to choose from, and they can be rather intuitive to use. The reason these have become popular lately is that small business owners don’t want to wade through coding and widgets to get a site up and running.
Popular WYSIWYG builders include Wix, SquareSpace, and Weebly. The best article comparing these options (and WordPress) is here:
https://www.codeinwp.com/blog/wix-vs-squarespace-vs-virb-vs-weebly-vs-wordpress-theme-builders/
The reasons why we don’t recommend these types of site builders for insurance agents are because:
- They lack the plugin options that could make life easier for your website.
- They’re difficult to optimize for search engines (SEO) because they don’t offer access to nitty gritty technical aspects like meta descriptions, no-index tags, alt image tags, etc.
- They don’t show web development languages like JavaScript, CSS, or HTML.
- They can be buggy.
We still feel WordPress is the way to go, even against these WYSIWYG editors. So, let’s talk about how to build a WordPress website.
Setting Up WordPress
Now that you’ve set up WordPress in your hosting back office, log in and start configuring your settings. We won’t attempt to walk you through every WordPress setting in this article, like:
- Attaching your Logo
- Naming your Site
- Breadcrumbs
- Permalinks
- Widgets
We recommend these more detailed guides to walk you through setting up individual configurations on your website
- http://www.wpbeginner.com/how-to-install-wordpress/
- http://www.wpbeginner.com/wordpress-seo/
- https://yoast.com/wordpress-seo/
What’s in a Theme?
With WordPress installed, you’re ready to pick a theme. A theme, or website template, helps you style and decorate your website with certain color palettes, images, widget areas, etc. An insurance website template or theme usually costs anywhere from FREE to less than $200. A good theme like one from StudioPress will run $50-$75. This is one of those things where you get what you pay for, so it pays to splurge a little to get a quality look to your website.
93% of consumers consider a website’s visual appearance as the key deciding factor in whether or not they make a purchase.
Of course, you don’t need an insurance website template if you’re comfortable writing HTML code to design your own site from scratch, or to pay a web designer to do it for you. But for DIY agents or those who want to avoid the hassle of hiring a web designer can just buy a template, upload it to their site, and have a nice foundation to start creating filling with content. Themes are getting easier and easier to use, with a one-click demo set-up feature that allows you to replicate the demo site template quickly so you can start customizing it right away.
There are TONS of website templates out there, some specifically created for insurance agents. Just don’t confuse a theme with a landing page, which you will often see labeled as “template landing page.” You want a website theme template. A landing page template is just that, one page, which we will cover more later on in this article.
Here’s a list of 22 sites that have over 100 insurance website template examples to choose from to get you started in creating your own website:
- https://www.templatemonster.com/category/insurance-website-templates/
- https://www.themezy.com/free-website-templates/28-insurance-responsive-template
- https://www.template.net/web-templates/website-templates/insurance-website/
- https://themeforest.net/tags/insurance%20agency
- https://colorlib.com/wp/wordpress-insurance-themes/
- https://athemes.com/collections/insurance-wordpress-themes/
- http://templates.entheosweb.com/Insurance-Company.asp
- https://nexusthemes.com/item/insurance-company-wordpress-theme-307/
- https://themes.psdcenter.com/insurance-websites/
- https://www.nimbusthemes.com/wordpress-themes-for-insurance-agents/
- https://www.prowpblogger.com/insurance-wordpress-themes/
- http://www.wordpresstemplates.net/corporate/15-best-wordpress-templates-for-insurance-broker.html
- https://www.freshdesignweb.com/financial-website-templates/
- https://agencyowl.com/insurance-themes
- https://www.theme-junkie.com/best-insurance-wordpress-themes/
- https://wpdean.com/best-insurance-wordpress-themes/
- https://www.web-savvy-marketing.com/store/bradley/
- http://www.responsivemiracle.com/best-html-insurance-website-templates/
- https://www.softwarefindr.com/best/wordpress-insurance-themes/
- http://www.wpresponsivethemes.com/themes/25-best-wordpress-responsive-insurance-agency-themes.html
- https://www.softwarefindr.com/best/wordpress-insurance-themes/
- https://wplift.com/insurance-wordpress-themes
When choosing a theme or template for your website, look for one that’s recently and regularly been updated so it works with the latest versions of WordPress, plugins, and widgets. Themes that aren’t updated may break or not work properly, and could also leave you open to being hacked.
Plugins vs Widgets: What’s a Widget?
Two important terms you’ll see in these guides are plugins and widgets. It can get tricky here to know the difference between the two; all widgets are plugins, but not all plugins are widgets.
Widgets are “drag-and-drop” pieces that create areas for extra content to be displayed. Usually widgets are used when designing the home page and the sidebars on pages or posts, as well as content areas at the top or bottom of a page. A common widget might be located on the righthand side of a blog post, showing the most recent or most popular blog posts published on the blog. Another widget might be at the bottom of a post, recommending other related posts to read next.
Plugins, on the other hand, add supplementary code to a page or website that increases its functionality and performance, perhaps by speeding up your site’s load time, compressing image sizes, or creating multiple pages at once in the back-office. One plugin might generate a contact form, while another filters out spam in comment sections, as another optimizes each page for SEO, and another backs up your entire website’s content.
While your website users see and interact with widgets on a page, a plugin typically runs in the background to keep the page running properly, so your visitors might not even know it’s there. (Of course, a plugin might also add a widget area to your site, which is where it gets confusing!)
There aren’t many guides about which widgets to use, but you’ll see TONS of guides about what plugins to install for WordPress.
Here’s a list of the top 10 plugins that we recommend on your website and why:
- Akismet: Helps you moderate and analyze comments
- Yoast SEO: One of the best SEO plugins out there; the premium version can really help with local SEO
- Jetpack: An all-around optimizer that helps keep your site humming along
- Google XML Sitemap: This helps Google index your webpages and posts into the search engine results more quickly
- Broken Link Checker: Nothing ticks off Google more than broken links. By fixing them with this plugin, you’re plugging the holes in your boat so your SEO value doesn’t leak out
- All-in-One Schema Rich Snippets: This displays vital snippets or summaries of webpages that are often found at the top of Google before the organic results. Some items to markup would be frequently asked questions and answers, star reviews from Google, contact info, etc.
- MailChimp: This integrates MailChimp’s email marketing platform into your website so you can start building and nurturing your email list – which should be a No. 1 priority in online branding
- IFTTT: This plugin, which stands for “If This, Then That” can be used to syndicate your content across multiple channels and websites for more exposure
- SEOPressor: This plugin is “designed for controlling SEO with ease.” This is an alternative to Yoast, and it can do everything Yoast does.
- W3 Total Cache: This plugin helps decrease load times and increase your site speed, which is especially helpful if you’re using shared hosting
Consumer satisfaction drops 7% for each second a website takes to load.
Each plugin requires its own settings, so be sure to double-check the settings as you install each one. If you’re having a tough time figuring out a feature or a setting, simply google it and you will find a plethora of blogs and guides to help you out.
Also, one last piece of advice before we go to the next section:
ALWAYS KEEP YOUR THEME AND PLUGINS UPDATED!
Perhaps the most common culprits that open up websites to hackers are outdated plugins or themes. A nice preventative service to use is Site Guard, which scans your site, similar to your computer’s antivirus software.
Another preventative measure, and one that will help you rank better, is adding a Secure Sockets Layer encryption, or SSL certificate, to your site – which would make the prefix for your domain ‘https’ rather than the less secure ‘http.’ Sites with “https” are more secure sites, and if you’re asking for private contact info from consumers to create insurance leads on your website, you definitely want an SSL certificate – because this year, Google began flagging sites that don’t.
Adding VeriSign or Symantec SSLs can help increase sales by 42%
Let’s Do a Quick Recap

I know this is a ton of info to throw at you, so I want to make sure we summarize the highlights before we go on to the next section, where we’ll start creating the actual pages of our website. To recap, before you can start creating webpages, you have to:
- Buy a domain
- Buy hosting
- Set up a CMS (WordPress) in the hosting back-office
- Configure WordPress settings
- Install and configure plugins and widgets
- Upgrade the security on your site
After these items are completed, you can feel proud knowing you built your website on a safe and secure foundation that will also be a more effective lead generation tool for you.
Pages or Posts?
Before we dive into the important pages you need to have on your website, let’s answer a common question that we see on many forums – should you be using posts or pages to build your website? They both display content, so what’s the difference?
Posts are content entries that appear in reverse chronological order on your blog. Because these entries are automatically organized by date and time, they are meant to be timely or informative. They can also be categorized by tags like “Medicare” or “Final Expense,” to present website visitors with in-depth insights around a certain topic.
Pages, on the other hand, are more timeless, static content entries like your About Us page, services page, or Contact page. Pages aren’t tied to date and time like posts are, but instead they are organized in a hierarchy, which means sub-pages (or child pages) can be nestled underneath other “parent pages”. So underneath your main services page, you might have a sub-page for Final Expense and another for long-term care.
We recommend using pages for important pieces of content (like the ones we’ll list below), which often include landing pages for your services, the types of insurance you sell, or the locations you serve. Posts are more suited for your blog, to go in-depth on a specific topic that might be interesting to your readers.
An easy way to remember this is that POSTS are for the BLOG (both have the vowel ‘O’) and PAGES are for LANDING PAGES.
What is a Landing Page?
Technically, a landing page is any web page that a visitor can arrive at or “land” on to get to your website. But in the context of online marketing, a landing page is a page that’s designed around a single focused objective, like getting someone to opt in to your product or service.
Some examples of landing pages include:
- Home Page: Perhaps the most important landing page on your website
- Products You Sell: If you sell books, offer consultations, etc.
- Types of Insurance You Sell: Separate pages for each line of insurance you offer
- Types of Services You Perform: Do you add value through a unique service like business valuations?
- Locations You Serve: If you sell health, auto, or home insurance, the locations you serve are important keywords – usually found in towns and metropolitan areas. Keywords for long-term care insurance, life insurance, and disability are rarer searches in specific towns; you might find them in larger metropolitan areas, but they’ll still be low-traffic keywords.
- Thank You Pages: If someone fills out a quote form, subscribes to your newsletter, or buys an item from your site, make sure you have a thank you landing page set up that they’ll see after completing that action. This will also help you track conversions through Google Analytics to see how many people are signing up for your offers and how they navigated your site to get to that offer before clicking.
Agents can find many insurance landing page templates that range from tens of dollars to hundreds. Usually these are designed to get people to submit their info for a quote.
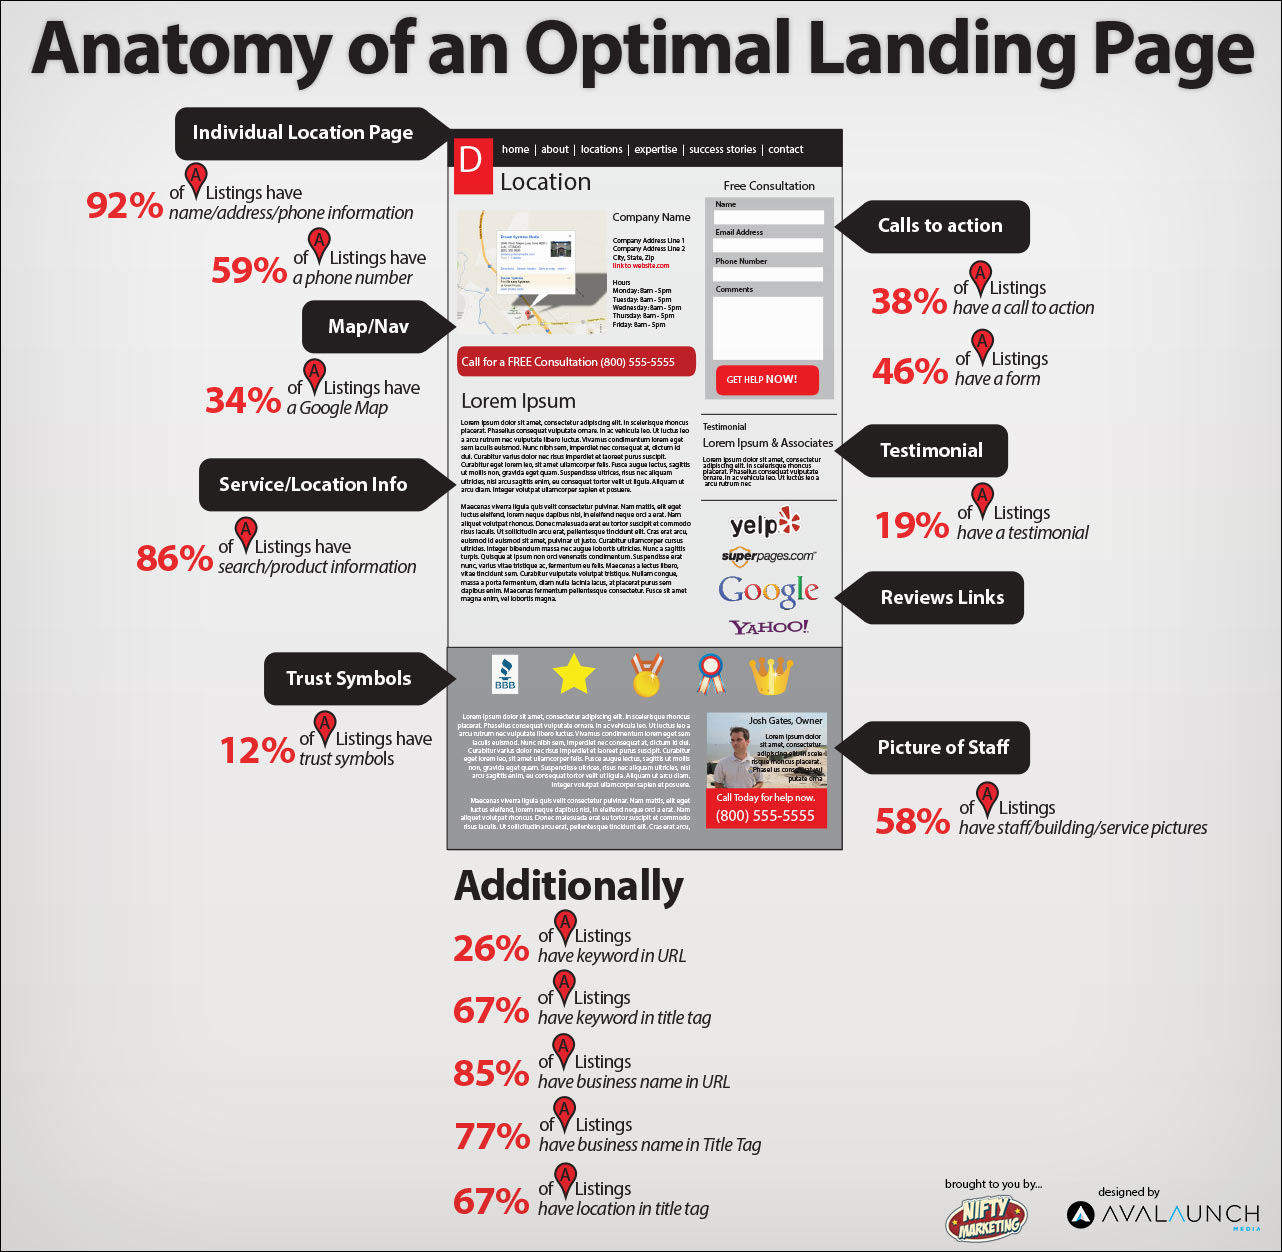
To see an optimal landing page and its various facets, check out the infographic below from Nifty Marketing:
Here’s another landing page infographic from Tide Interactive showing some common components of landing page templates:

The Foundational Pages of a Website
Now that we know the difference between posts and pages, and understand what landing pages are, let’s talk about the basic pages you need to set up on your insurance website. These don’t include any other landing pages we talked about above – so if you sell more than one type of insurance or service more than one area, and you want to be found for it, then create additional landing pages for each one of those services or locations.
With that in mind, here are the 5 types of foundational pages to set up:
1. Home Page: This is THE most important page of your website. Some people use a ‘parallax’ (single-page) scrolling theme for their website, which goes to show you how important a home screen can be, if people are using that one page for their entire website.
Items you want to have on your home page include:
a. Email newsletter signup
b. Services, locations, or types of insurance you sell (each may link to its own landing page)
c. Introductory videos about you and your agency
d. Recent blog posts
e. Opt-in graphics advertising ‘FREE QUOTES’ for the insurance you’re selling
Some home pages may have more or less content than others, depending whether you sell more than one type of insurance. If you only sell one type, then you might want to make your home page your landing page for quote requests, and have visitors opt-in there instead of sending them to a totally separate landing page for one service.
2. About Us: This page is crucial to any website. This tells people a little bit about you (and/or your agency), and can be a deciding factor in how (or whether) you convert visitors into leads. If your About Us page is weak, then expect less leads – because people want to know that they are putting their information in capable hands and not in a fly-by-night agent’s hands who couldn’t communicate to the visitor some of these items:
To introduce yourself to website visitors, your About page should address:
a. Who you are
b. How long you’ve been in the insurance industry
c. Who works for you
d. What types of insurance you sell
e. Where you sell those types of insurance
f. What your typical client or prospect looks like (who you serve)
g. Where your office is located
To put it easily, this page should be designed to sell people on YOU. Pictures are VERY important here, so are client testimonials if you have them. If you have collected enough testimonials, you can even create a separate page for them (especially if you have video testimonials) and link to it from the About Us page.
3. Contact Us: This page can double as your quote page if you don’t have access to a consumer-facing quote engine. This is where people can contact you if they want a quote or have a question. Most consumers would rather call you or email you than submit a contact or quote form, though, so always display your email and phone number at the top and bottom of your website to give people more options for contacting you.
When designing your contact form or quote form, just remember that the more fields that you add or require people to fill out, the less conversions you will get. Just as the most vague and general direct mailers are often the most successful, so are contact/quote forms with fewer fields in them.
At the minimum, your contact form should ask for someone’s:
a. Name (but don’t use two fields for first and last names unless you plan on selling the lead)
b. Email Address
c. Phone Number
You may want to include additional fields like zip code, age, spouse’s name and age, smoking history, etc., but be warned you may find fewer leads in your inbox to follow up with. Only include the minimal fields necessary to follow up with that person to set an appointment or to present over the phone.
4. Privacy Policy & Terms of Service: Although these are the most boring pages to talk about, they can be some of the most important to have on your insurance website. Every site that wants to appear legitimate and worthy of ranking in Google’s organic search results should have a Privacy Policy page and a Terms of Service page. There are some free sites where you can create templates of these pages in a pinch (we recommended a site in our insurance sales training book). But if you have the time, we recommend having a personalized one created –hopefully one that your attorney has perused and approved.
5. Blog: Some sites, especially those that use parallax scrolling, don’t always have a separate blog area. We’re here to tell you that setting up your blog is 100 percent vital to succeeding in online branding. Your blog is where you discuss topics that target informational keywords, as opposed to the “buying” keywords targeted on your landing pages. (For a keyword refresher, check out the blog we did about keyword research earlier this year). Blog posts about topics like “Michigan Medicare Part B” or “Michigan Disability” are key components to educating your leads as they move through the sales funnel, before they get ready to buy. We will cover more about creating content for your blog in an upcoming blog post.
B2C companies that blog generate 88% more leads per month than those that don’t.
However many pages you decide to have, make sure you follow this one rule: Make your site easy to navigate. Even a website with dozens of pages can be built for smooth perusing if it’s organized logically. Make sure there are no “orphan pages” that can’t be found through the primary (or even secondary) navigation bars. Remember, an easy site to navigate is an easy site to buy from:
Improving website usability or navigation can boost ROI by 83%
Optimized for Mobile Search

Before we finish out our basic guide on designing your own insurance website, we want to stress another feature that your WordPress theme needs, and that’s called “mobile responsiveness.” What that means is if a web visitor is browsing your site from a mobile device, the theme will appear more condensed and more easily navigational, based on the screen they’re viewing. A responsive site will look different on a smart phone screen, compared to a tablet screen, compared to a desktop computer, to ensure that the most important information is visible, based on the space available.
Google has made it abundantly clear that websites that aren’t mobile-optimized will have a hell of a hard time ranking in the organic search results. If you don’t have a responsive theme, you’re in luck, because Jetpack – the WordPress plugin we covered and recommended above – can easily configure your theme to be mobile responsive.
75% of smartphone users abandon sites that aren’t optimized for mobile.
We hope this guide gave you enough information to successfully set up your own insurance website. If you have any questions throughout the process, leave us a comment below for us to address when we update this post.
If you’re not convinced that DIY is the best route for your insurance website, check out this month’s sister post reviewing the most popular insurance web design firms and services that will set up your website for you.
And if you’re still wondering how to fill your website with interesting and captivating content that will increase trust with prospects, referrals from clients, and bring more leads to you, then stay tuned for our upcoming post on Content Creation.


Thanks for your valuable suggestions, I glad to inform you that I have decided to take your advice and implement it.